
Recently I had some time to put the Hinode Solar Guider (sold by Hutech) through some paces with a PC connected to the new Hinode Windows control program. The video of this session is below. The Windows Hinode control program is available for download to all purchasers of the solar guider. If you're unfamiliar with the concept of a solar guider, jump to the section below the video where I've added a quick intro to the guider. I've also added some tips for using the guider at the bottom of the page.
Video link on YouTube
While I think the operation of the solar guider is pretty clear in the video, after showing it to some other amateurs, I realized that because most amateurs are more familiar with star guiders used at night, the product was a little confusing to those new to the idea, so here's a little background information...
Why Do We Need a Solar Guider?
At this point, if you're not a sun-watcher, you may be wondering why a solar guider is necessary at all! The answer is that for extended viewing of the sun, you'll find the sun inevitably wandering off target. Especially in a portable setup, it's nearly impossible to achieve accurate polar alignment of your mount during the daytime. Also, as the sun position gets lower in the sky atmospheric refraction takes hold, ruining the tracking of even a perfectly aligned, perfectly operating mount.
If you've ever attended an astronomy public outreach event where telescopes are showing the sun, you've probably noticed the need to frequently re-center the telescope. And if you've ever attempted to photograph the sun over a long period (e.g. for time-lapse sequences), you know that you have to be practically glued to a guidescope or camera monitor to insure the sun doesn't drift out of the field of view. The worst cases I've experienced were the two Venus transits (2004 and 2012), during which I spent 5+ hours virtually continuously at the eyepiece to insure the sun wasn't drifting out of the camera's field of view!
Star Autoguider vs. Sun Autoguider
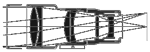
A standard night-time star autoguider is normally supplied with only an imaging sensor package. You must generally purchase the optics separately. Usually a refractor with an objective in the range of 50 to 75 mm (diameter) is used, or the guider is used with an off-axis pick-off mirror. Most of the time, the guider must be controlled from a PC, making a computer an integral part of the system. In some cases, a microcontroller, internal or external to the guider can do the guiding.
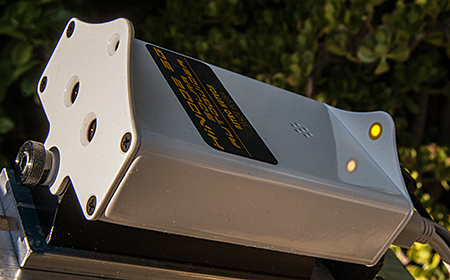
In the case of the Hinode solar guider, the guider processor, as well as the optics are contained in one unit. A hand controller can be plugged in to start the guider and monitor operation, or the guider unit can be plugged into a PC for essentially the same control and to provide a more graphic display of the operation. Or both the hand controller and PC software can be used in parallel.
In contrast to a star autoguider, power consumption for the Hinode Solar Guider is minimal. Since no sensor cooling is necessary, the unit runs off the power from a USB port. In addition, there is no need for a dark frame to be taken.
The other major difference is that while a star guider is designed to lock onto a single star (virtually just a pinpoint), the Hinode solar guider looks at the sun as a whole and guides the telescope and mount accordingly. Because of this, the system will not be following any particular spot on the sun, but rather the "average" center of the sun, even as it deforms due to refraction through our atmosphere (e.g. the flattened sun at sunset) or poor seeing.

Getting the Guider Running
Setup of the solar guider simply consists of mounting the guider piggy-back on your telescope, plugging into a USB power source (not necessary if connected to a computer), and/or the hand controller, and then plugging the guide control cable into your mount (compatible with a standard Losmandy/SBIG connection). For proper operation, the mount guide controls should be set to move in each direction at about the sidereal rate, relative to the normal star tracking rate. On a Losmandy stepper motor mount such as the one I used, the setting is "2X". Of course it shouldn't be necessary to say so, but YOU SHOULD HAVE A PROPER SOLAR FILTER ON YOUR TELESCOPE too!
Next the solar finder on top of the Hinode SG is used to point the system roughly at the sun. On the top of the box, there is a "sighting" hole on the front end which casts a shadow on the back end. Centering the bright image of the hole on the rear yellow target insures that the Hinode guider can see the sun on its sensor array. It's important to note that this is NOT an image of the sun, but just a shadow of the front end, so you shouldn't expect to see any sunspots here!
Using the mount controls, you would then center the sun in your telescope visually using an eyepiece. If you've done a reasonably good job of co-aligning the Hinode SG and your telescope, you can alternatively activate the audible sun-finder tone either using the hand controller or the Windows control program. This mode allows you to simply hear the pitch from the guider change as you get closer to centering the sun, which is convenient if you happen to have a camera occupying the back end of your main telescope.
Once the sun is centered, a calibration sequence needs to be run so the solar guider knows how far and in what direction your mount will move when the controls are activated. With my Losmandy mount set at "2X" movement rate, I could use the shortest calibration sequence with no problem.
After a successful calibration, all that needs to be done is to point your telescope at the part of the sun you wish to follow and then press the "Guide" button on the hand controller or equivalent Windows control.
Once a successful calibration is done, the guider will remember the settings even if the power fails. So if that should happen, all that is necessary is to press "Guide" again. For a mount which will not be moved, you also have the option of storing the settings into memory explicitly. Two memories are available so that you can store an "AM" and "PM" setting which are meant for use with a German equatorial-type mount which requires a meridian flip near noon.
The Test Run
For the purposes of my test run, I used my Borg 100ED (4") refractor, a Thousand Oaks broadband solar filter, Losmandy GM8 (stepper motor drive) mount. The mount was set down without accurate polar alignment. I simply placed the mount in position, eyeballing the position relative to my E-W/N-S fence walls. I also did not bother to level the mount.
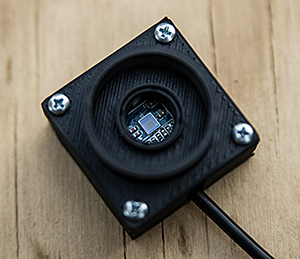
To record the image of the sun, I used an inexpensive 640x480 pixel webcam which I re-packaged in an enclosure I printed on a 3D printer. The free software FireCapture was used to display the image from the webcam and to record it for later examination. In addition, the Hinode Windows control program was used to record the tracking data from the guider. The PC used was a Sony VAIO T-series laptop running Windows 7.
My test run was started rather late in the day (after 4PM), so seeing was not very good, and the sun was already deformed by the lower atmosphere, so it was a good test for guiding. Since I didn't have any conveniently placed clouds, I "stress" tested the guiding by allowing the guiding to run until the sun was well into the fronds of the nearby palm trees. Considering the severe interference, the guider did pretty well -- it kept re-centering the sun when in gaps between palm fronds. Under normal conditions, higher in the sky, and on a clear day, the guider will not have any problems at all.
Drifting of Features on the Sun
For observer/astrophotographers following a feature on the sun at high magnification, one thing you might have noticed on the video is a gradual drift of the sunspot I had initially centered in my camera. This could be due to several reasons.
- First, my mount was not accurately polar aligned. When autoguiding using the edges of the sun, we are essentially guiding on the center of the sun. So if the scope is not accurately aligned, the image will rotate around the center of the sun.
- The second reason is that when viewing the sun at low angles to the horizon, atmospheric refraction distorts the shape of sun, the apparent position of the spot will change in relationship to the sun as a whole, depending on the altitude of the spot relative to the center of the sun, referenced to your horizon. Remember that the RA/Dec position of the solar coordinates are not aligned to your local altitude/azimuth and depends on the time of the year.
- Another possibility is a mechanical issue. If the Hinode guider is not tightly and rigidly coupled to the main scope or the autoguider cable or hand controller are pulling on the Hinode, the guider and scope could be gradually shifting relative to each other (differential flexure). The same could be true of the coupling of the camera to the main telescope. It's not unusual to have a heavy camera and its cables pulling on an extended drawtube and focuser, causing a shift in the image depending on the position of the sun in the sky. In my setup, this is unlikely to be the cause of the drift because the camera is so light (a modified USB webcam in a 3D-printed plastic box).
Some Tips for Best Operation
And finally, here are a couple of tips I can offer for best operation with the solar guider:
- Make a reasonably good effort to align the Hinode SG with your telescope so that the Hinode's finder mode aids can be used to center your target in your scope simultaneously.
- While alignment of the mount is not critical, it pays off to be somewhat aligned so that if clouds come along and the guider loses the sun, the mount will still keep the sun close enough for the guider to recover the sun after an interruption.
- Passing through clouds (or tree leaves) will cause the sun to be partially obscured at times, causing erratic guiding. So I suggest reducing the guider's"aggressiveness" setting when approaching a patch of clouds.
Additional Information
For additional details, go to these Hutech pages:
- Product description
- Operation Manual (using the hand controller)